Sketches
To begin my project I started by sketching out some rough initial ideas of various objects which I require to build my scene, although I’m considering using less assets to increase the amount of detail I can add.
Below are some sketches of weaponry which I have used my research to merge various weapons together to create my own type of sci fi gun.


The first image below displays 4 very very simple sketches of some lighting which I could include in my final piece, however the lighting I have decided to use isn’t the most detailed asset so sketching seemed rather pointless. (It’s a simple wire light, a strip which will go around the room/underneath objects)However I could use the other ideas if I have enough time, such as the quick hologram sketch on the bottom right of the first image.
As I was looking through my research of room layouts, I noticed various aspects of the rooms which I could include to build the scene further and increase the detail. These pipes, bulletboards and possibly mirrors. I also could potentially include a blueprint with a rough outline of the gun I’m aiming to make stripped down to it’s basic parts.
As I’m keeping my scene extremely simplistic to increase the smaller details on less assets, this obviously means I won’t have a huge amount of sketches to produce, however below you can see some sketches of the workbench/desk I wish to have in my scene to display my weapon. I’m not overly happy with the fact that I have to produce a small scene for display purposes however as I’m keeping it extremely simple this shouldn’t be such a huge task.


Below are two sketches I quickly drew up to give myself an idea of how I could potentially layout my scene, As you can see I have only drawn two as the scene I’m making will be extremely small as to allow me to stress less about producing a large amount of assets to fill the area inside. I also decided to make a small scene due to the fact I only wanted to model a high detail weapon but was suggested to make a room to display the asset.


While looking at my scene I thought that it would look incredibly empty without some filler assets, So i’ve produced a variety of sketches of assets such as chairs, trash cans and weapon stands. I will further develop on these ideas in my blockout stage and decide on the best asset for my final product.


Blockouts
Gun Blockouts
To begin the development of my weapon I’ve used the sketches produced before-hand to create 4 different types of weapons based around my various ideas. Below are a few different types of weapon that I could potentially create for my final piece, I have already decided on my final weapon idea as it stands out to me the most. This is the final blockout under the three images, the reasons I have chosen this is because I have merged two weapon ideas into my own type of weapon using reference images and sketching. I’ve blocked out 4 different classes of guns, including a rifle, shotgun, a small machine gun and a more futuristic rail gun using district 9 and anther image as reference. I prefer the final rail gun design as it looks more unique and has a far more appealing shape.


Bench Blockouts
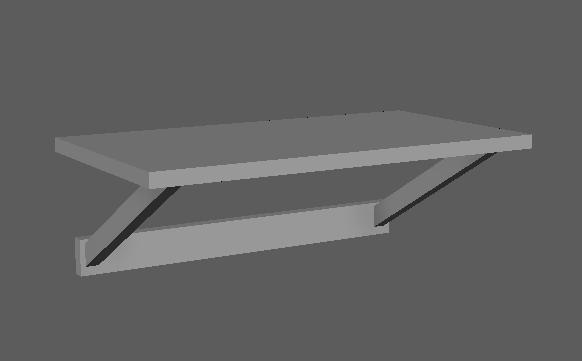
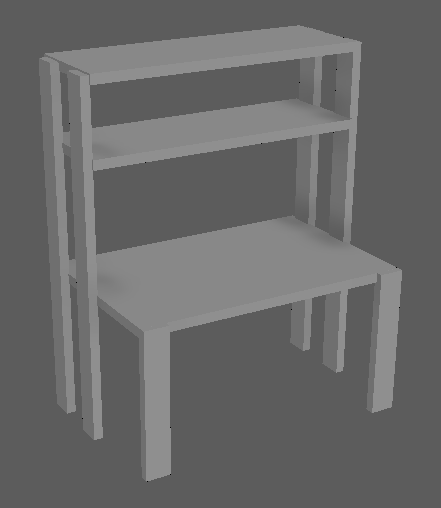
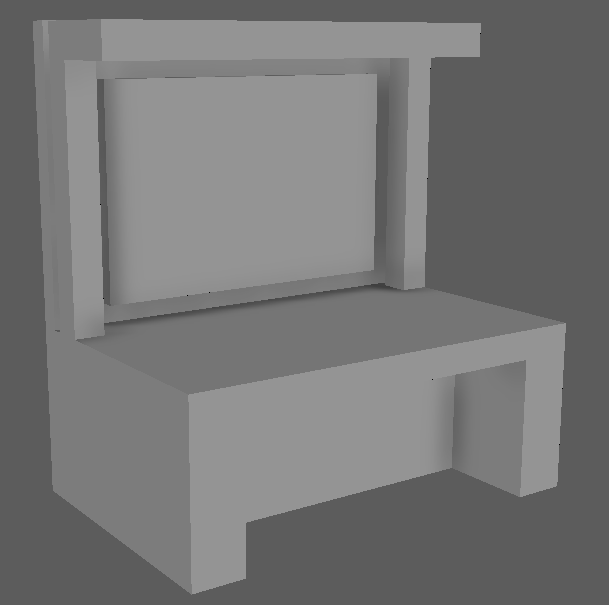
Due to this asset being relatively simplistic, I have only created 3 basic blockouts based on the sketches produced above to create a very rough outline of each style of asset I could potentially use for my final piece. As you can see in the images below, I’ve produced 3 very rough blockouts of various benches including a wall mounted shelf, a very simple thin wooden desk with two upper shelves and a more bulky workbench with a mounted board on the back for tool storage. Some of the possible tools I could include are:
- Wrenches
- Screwdrivers
- Pliers
- Spanners
- Drills
- USED DOOSAN B25X-5 2500KG ELECTRIC FORKLIFT
Layouts
To further plan the layout of my scene I have produced more blockouts within unreal using basic shapes to display where certain assets will be located. I’m not particularly fond of these layouts however I will most likely be using the final image in the slide as it is simplistic and the lack of detail won’t take attention away from the focal point of my scene. The first image is a very simple blockout of one layout I could potentially use for my end result, as explained above it is in a very small scale as to not draw attention from the main focal point which is going to be my weapon. In the second image there is another screenshot of the first layout, color coded to easily display where each asset will be placed.
- Green: Bulletboard
- Red: Shelf
- Blue: Weapon
- Orange: Desk/Bench


I decided to play around with some more layouts for my scene in Maya as I’m still not entirely sure how I’m planning to layout my scene. Below is an image of one of my ideas which was to have the workshop within an attic, however I’m not a huge fan of the idea of using a large amount of wood to texture the majority of my scene so I will most likely not be using this idea.

Color ideas
Weapon
Below are two swatches generated using a website which allows you to upload an image and it will randomly pick 5 colors on the image. I am aiming to replicate the colors of the weapon from district 9 with some alterations as my weapon will not be entirely the same as the one below, however the colors of the weapon stand out rather well so I will be using the same theme with different patterns.


texture ideas
In the images below you can see a variety of smart materials from substance painter which I will be using as a reference when producing the materials for my own assets, Some of these include, Metals, Leather and concrete. I will be further testing with alternate styles of leather metal and concrete to see the best visual outcome however these are here simply as ideas.


Modelling tests
Weapon
When i began modelling my weapon as a test, I got slightly carried away and decided to use the test as a final piece as I have spent a very long time detailing this asset. I personally think that I’m doing a good job merging the two references together to create my own design however I am not entirely happy with the design currently, maybe with some more detail it will look better.
In the video you can see an animation, this was an idea I had originally planned as I didn’t want to create a scene and have been practising with key animation in Maya and wanted to further develop this skillset. However I have decided not to animate the asset and focus more on detailing the finer parts.
In the first image below you can see my weapon more or less finished, however there are parts of the asset which I’m not overly pleased with so I will be going back and removing/altering certain aspects to hopefully make the gun look more visually appealing and less blocky. The second image is a close up image of the gun which I had planned to animate, I’m planning to remove this and alter it slightly as I don’t think it looks very good at all plus I’m not animating the weapon anymore so this feels relatively pointless to keep.


Hologram/Stand
Taking a break from modelling my weapon, I decided to further look into ways I can display my weapon in unreal engine. After some thinking I remembered in District 9 there was a scene with a hologram, So I found the scene and began designing the stand for the hologram in my own style so that I could display my weapon in the form of a hologram. This will mean doing further research into creating hologram materials within unreal however I think this will have the best visual outcome.


After scouting youtube I found a tutorial on how to create a hologram material in unreal engine, which I followed to produce the material shown below the video.
Below is a video of the material created using the tutorial above, this took me quite a long time as I was trying to fix parts of the weapon which shows overlapping objects which I couldn’t manage to figure out. Due to this I will most likely not be using this idea and will go back to my previous idea of just having a floating weapon.
After testing with hologram materials I decided to go back and fix the parts of my gun that I thought didn’t look very good, in the images below you can see the part which was causing me a great deal of pain to look at so I decided to remove it completely, I will however be replacing this with something that will hopefully look far better in the long run.


