Week Number 3 & Date: 24/02/20
List of Tasks planned for this week:
This week I plan to produce a variety of sketches of the various components required to build my vehicle such as:
- Front Bumpers
- Rear Bumpers
- Side Skirts
- Hood/Bonnet Scoops
- Spoilers
- Rims/Tyres
- Layout Photobash
I also plan to complete a series of sketches of various environments I could possibly display my vehicle in for the final product such as layouts.
Current Position –
The efficiency of the production of my work means that I have finished all of the sketches listed in my plan plus various other ideas and test pieces for this stage. These include:
- A large variety of sketches for all components of my vehicle
- Various photobashes
I produced these as this helps with the development of my project as I can use the ideas generation and test pieces to help influence the best possible outcome of my final product. Below are quite a lot of images displaying what I’ve done this week.
Sketches for restored version
front bumpers
Below are various sketches of potential front bumpers I could model to fit to the vehicle I plan to create, to produce these sketches I used the various research collected as reference and combined some ideas of other car bumpers and even some external non standard bumpers produced by other people to create my own ideas. Some of the sketches are not particularly detailed however I’ve tried to sketch certain parts of the bumpers to display depth (for myself) for when it comes to production. I’m not entirely sure which bumper would look best as of right now however I will produce a variety of blockouts/photobashes which will further support the development of my ideas and allow me to choose which would look best with evidence of exploration.


rear bumpers
For the rear bumper of my vehicle I have produced several sketches which although some are rather simplistic, will in my opinion look the best on the vehicle I’m creating as I personally think that the vehicle I’ve chosen to make is a rather standard blocky shape which would look rather silly if it had overly complex detailed components, however I will explore the ideas shown below to see if my opinion is correct. I do however like the fourth image as it would fit rather well with the idea of having a wide arched vehicle which would look best on a rally vehicle in my opinion.


spoilers
The vehicle I have chosen to create has a rather bland rear end and the majority of spoilers for this car would not suit it at all, so I decided to look at various rally vehicles which tend to have over the top spoilers however really suit the vehicles in my opinion. Below I have sketched some ideas of potential spoilers which I can further explore in the development stage of this project using blockouts and some photobashes, however I am thinking of completely leaving out the spoiler for this vehicle currently.


rims
Using the research collected as reference, I have produced a variety of sketches shown below which display several styles of rims which will allow me to have more choice for when it comes to deciding which style of vehicle I am going to produce, based on the style of vehicle I choose to create will influence which rim I will end up using. For example there is an image labelled ‘Rally’ which is a very simple rally style rim designed to keep mud from getting stuck in stubborn locations on the wheel. I am currently thinking due to the ideas generated, to produce a rally vehicle as I personally think this will require the most amount of detail and change to the original vehicle itself which will hopefully improve the quality of the final outcome.


Hood Scoops/Bonnets
Through the use of the various images collected during the research stage of this project I have been able to use the images as reference to sketch various types of hood scoops/bonnets which I could potentially use on my vehicle. I will further test with this idea as I am not entirely sure how well this would work with the particular type of car chosen to model for this project however some of the more simple designs may actually prove to look visually appealing, through the use of photobashing I will test the various bonnets and hood scoops of various cars.


Side skirt
Below are some very basic sketches of possible side skirt designs created using a variety of car bodykits as reference, merging different pieces together to create my own. However as this component of the vehicle is intended to look rather subtle, the sketches are obviously going to be relatively simplistic. I have however lined out for myself, where potential bevels and dips could be within the component itself, for example in the second image there are lines which intersect allowing me to notice that there should either be an extrusion/bevel which I could test to see which look best during the production of blockouts. Overall this component is not necessarily important due to the simplicity however I’ve just included sketches as to not copy pre existing body kits created by others.


photobashes for restored version
Front End #1
After collecting reference images and producing various sketches of the potential components for my vehicle, I have produced a photobosh below using 3 different images as well as using the base vehicle itself to create my own spoiler for the vehicle by cutting pieces of the side/bonnet of the vehicle to keep the same color scheme. The images I have used were to create a somewhat rally type car as in my opinion this would require the most drastic alterations and will allow me to add an increased amount of detail to my ‘Restored’ vehicle. In my opinion, I am rather happy with how this photobash turned out even though some parts are quite sloppy however as a base reference for what I could potentially create, this works extremely well in my opinion.


Front end #2
Below is an image of my second complete photobash using a different collection of reference images, I wanted to try and test parts from vehicles which wouldn’t necessarily be seen integrated to this vehicle just to visualize how this could potentially look. This photobash in my opinion isn’t really interesting when looking at the rear/wheels however the focus on this is the front end which actually looks rather interesting and fits extremely well in my opinion. Because this worked so well I will produce blockouts/tests to further increase the options of the front components of my vehicle.


SONY DSC 

front end #3
To further increase the choices of the style of vehicle I could potentially create, I have produced another photobash of the front end of my vehicle using the various images collected below the final product. I decided to switch things up for this one and use parts from 3 different cars, mainly focusing on the bonnet style and rim/wheels. I’m not overly happy with how the front bumper looks for this vehicle in particular however this was useful as I know now that this is not going to be a viable option unless it looks better in the final product, therefor I may create a rough model of this front bumper to see if it could potentially work.


Rear end #1
After producing various photobashes based around the front end of the vehicle I aim to create, I decided to start creating some based around the rear end of the vehicle. For this particular photobash I have used various components from rally hatchbacks to see how well this could fit for my particular vehicle. In my opinion I am not very happy with the outcome as it looks rather unrealistic and I could have done a far better job, however I did the best with the images that I could find for the particular angle of the base vehicle. This particular style is however my favored design, not in terms of quality but I just personally feel that this would definitely stand out a lot more than just a basic version of the original vehicle.


rear end #2
Using a singular image of a much more recent version of the VW Golf I am creating, I have combined the rear bumper which actually turned out surprisingly well considering this component shouldn’t fit this vehicle at all. The reason for not using more references and adding more to this photobash is because I was aiming for a simplistic boy racer style, I did however modify the color scheme of the tail lights and shrunk the roof of the vehicle to give it a relatively sportier feel. I think in combination with a wide body kit as explored above, this rear bumper would work extremely well and I will therefor definitely be exploring this further through the use of blockouts and tests pieces.


color ideas
After producing my photobashes of my restored vehicle, I realised that I hadn’t really explored any color ideas for the vehicle itself, so I decided to overlay some simple base colors over the main reference image which I could create a poll to see which idea people find more appealing. The aim for this is to make the vehicle stand out best in my scene and in my opinion, I am currently torn between the chromatic silver and the rather vibrant green color.


Layouts
Once I’d finished a variety of car photobashes I decided that it would be a good idea to create a simple photobash to display how I will be laying out my scene, I did this using a simple field, a muddy road and a singular pine tree which I strategically placed around the scene. Images used are shown below this photobash. I personally think this idea would stand out extremely well as I am most likely going to be creating a rally vehicle which would usually only be seen off-road and will also allow me to increase my knowledge of environmental modelling in Unreal Engine as well as the production of foliage and trees.


photobashes for chaotic variant
photobash #1 (texture idea)
Due to the fact that I am going to be modelling the standard variant of the vehicle, I will not be producing sketches/photobashes to alter the vehicle at all, however I am going to be producing some photobashes to display some possible texture ideas and possibly even some damage which I could potentially add to the vehicle. In the image below you can see I have added some basic rusting to the original image including some plastic/paint peel overlay over the number plate of the vehicle to display age related damage as well as a very subtle dent in the side of the vehicle which didn’t really turn out too well. Overall I am quite happy with this outcome as the rusting gives me a very simple visual idea of how I could possibly texture the asset as I have tried to place the rust in areas of the vehicle which would be affected by built up water causing further rusting.


photobash #2
To create the photobash below I used only two images and overlaid them over the vehicle which automatically put rust/dirt in strategic places due to the difference in lighting across the vehicle which allowed for a rather clean rusty look. I also used a splatter brush which was already integrated into photoshop to add another layer of dirt to the vehicle as to not copy the previously made photobash. Personally I think this looks far better than the first in my opinion due to the mass amount of rusting shown which is exactly how I want to display this particular asset. This will influence mainly the texturing stage of this project for this asset as sketching the already designed vehicle seems rather pointless in my opinion therefor I will simply be creating texture ideas and possibly some damaged variants of each component, however I would rather it just be rusted than fully damaged.


Planning for next week –
This week I managed to successfully complete all of the tasks set out for myself and even some which I had planned for the week after, ranging from sketches of the various components of my main vehicle I’ll be producing. In my opinion this is probably the easiest section of production as I have already produced a huge variety of research to influence my own style of sketching by combining ideas of the various images collected. Due to being ahead of my development plan I don’t have any need to catch up and can work on producing the tasks set for myself for the week after to hopefully keep myself ahead of schedule in case I make mistakes and need to improve on my work.
Week Number 4 & Date: 02/03/20
List of Tasks planned for this week:
This week I plan to produce some photobashes of the vehicle I aim to produce using various car parts to see which model style would suit the vehicle best and to test various color ideas. I also plan to produce some photobashes of the environment to use as reference for when it comes to creating/laying out my final scene.
Due to being ahead of schedule I will be moving onto blocking out the various aspects of my scene and main asset for the project which include:
- Hood/Bonnet Scoops
- Front/Rear Bumpers
- Spoilers
- Rims
- Side skirts
- Layouts
Current Position –
My current position for this week is being ahead of my own schedule set for myself, therefor instead of working on this weeks tasks I will be moving onto blocking out the various aspects of my scene and main asset for the project which include:
- Hood/Bonnet Scoops
- Front/Rear Bumpers
- Spoilers
- Rims
- Side skirts
- Layouts
blockouts
Hood/Bonnet Scoops
Below are some very simplistic blockouts of 4 different types of hood scoops created using the influence of my sketches and photobashes created previously in week 1, I could potentially develop further to allow a broader choice of this particular component, Although these blockouts are rather simplistic they still portray to me a potential style I could use for when developing this component further by increasing the detail of the blockouts to see which look the most visually appealing. This component will most likely be one of the most simplistic pieces for my vehicle, because of this reason this won’t be a huge piece of work requiring a lot of time put into producing it which is helpful as I’m not entirely sure whether I want this for the final product yet.


Front Bumpers
Below are a series of blockouts produced based upon the various sketches created during the first week as well as the large amount of research collected before starting our ideas generation. These blockouts the front bumper component of the vehicle I’ll be creating, I have developed these by combining the research and sketches into my own form of object to allow myself to have a unique style of front bumper for my vehicle. To create these I mainly used a simple set of boxes and used the boolean tool within Maya to cut strategic holes into the object. This will be extremely useful as I will have a larger form of reference when it comes to producing my final pieces as I could always simply just add onto these designs making them more complex, I feel like I have made great use of the boolean tool for this allowing me to efficiently produce quick and effective blockouts however I could have definitely added some more slight details.


rear bumpers
These blockouts below are displaying the rear bumper variants of my vehicle in their most basic form, put together using the ideas created in week one as well as reference material from the research collected in task 1. My overall favoured idea here is the final image displayed below, this is due to the fact that it is mildly more complex than the others and I can actually picture this being apart of the vehicle I’m creating, however the other blockouts although very simplistic are rather accurate considering I was aiming for a rally style rear bumper to fit my vehicle. Using these blockouts I will have a very basic shape/outline to use as reference to produce a higher poly version to see whether it would suit my vehicle or not, I could also potentially add further detail to these blockouts which would probably be the more efficient way of modelling, however I prefer combining the ideas into one using the blockouts as reference.


spoilers
Below are images of 4 different types of spoilers created using the research collected and sketches produced to produce my own style of the particular component. Due to the rather blocky style of vehicle chosen, it was rather difficult deciding which spoiler would fit the vehicle best however I decided to further research into rally vehicles which use rather over the top spoilers which would actually suit this model in my opinion. Displayed in the final image is my favoured blockout as I personally think this would suit the vehicle shape considering I aim to produce a rally style vehicle based off of a standard road vehicle. I think that this asset will be quite useful as I can model the base of my vehicle and place the blockouts in the correct areas of the vehicle to see which best fit and then continue to further detail the chosen design.


Rims
For the next set of blockouts I have produced 4 objects depicting different styles of rims I could potentially use for my vehicles wheels, as they are just blockouts I wasn’t too concerned about n-gons so I went with the same modelling style as before, using booleans to strategically cut shapes into a regular cylinder which formed the designs below based off of sketches produced by me and a large amount of research collected previously. Using these I could definitely further develop on the blockouts produced to create a far more complex style of rim for my vehicle which would suit the rally style I aim to produce. My favoured design is the final image however for my particular vehicle I would probably develop further on the 2nd idea due to this being widely used by rally vehicles, however I do enjoy the complexity of the final design. In my opinion I could have further explored various rally style rims for my vehicle because I have focused mainly on luxury style rims usually used on roads and are not suitable for off-roading.


layout ideas
Below is a very rough blockout of the scene I aim to create, I simply created a very low poly base outline of a tree which i then scattered around a dipped “Forest Road” which didn’t look great at all and I am not happy with this environment idea at all as of now, however I have further testings to try before giving up on this environment entirely and switching to my garage idea. I would still like to keep the reflection idea as I think this would make my project stand out far more than others as I will have shown creativity using the theme to generate ideas and display them visually.

Second attempt
Below is another blockout which I created due to the first one lacking content extremely and didn’t really show how I would be displaying my main focal asset so I have tried to make it more visible in this blockout. I’ve angled the camera how I’d end up rendering the final product as to fully display the effect of the reflection of the altered vehicle. I’m still not particularly happy with the environment as I think personally it will look extremely dull so I am most likely going back to my original idea of producing a garage to display my vehicle in front of. I will however continue to test reflection using this blockout to see if I can replicate the idea which is the main focus for my project.

Planning for next week –
Next week I plan to experiment with the reflection aspect of my scene as I am currently lacking knowledge on how I would potentially do this so I will need to watch some tutorials and test various other techniques to create this effect. I also plan to change my environment which means I will be producing further sketches and blockouts using the research collected previously. Overall I think that I have progressed rather well this week considering I am still currently ahead of the schedule which I set myself. As I have been through the process of the production of these particular assets/environments I have found that the majority of the tasks set for myself were rather easy to produce however I definitely did not enjoy producing sketches and was rather difficult to concentrate during the process of doing so.
Week Number 5 & Date: 09/03/20
List of Tasks planned for this week:
This week I plan to begin blocking out some base models of my vehicle including blockouts of the various components with extra detail to better visualise which components would suit the vehicle best.
Components for this week:
- Base Vehicle shape
- Front Bumpers
- Rear Bumpers
- Bonnet/Hood
- Side Skirts
- Spoilers
Render Target reflection test
For my initial testing for the reflection aspect of my scene I was suggested to research render target projection which allowed me to display what a certain camera was pointing towards as a material which gave me the result below. I am not overly pleased with the outcome due to the quality being extremely low resolution and I wasn’t able to fully create the result I wanted after a very long time of testing this particular technique. I’m starting to believe that this may be a flawed concept and may have to scrap the idea entirely.

slight idea change
Due to not being able to find a way to project a reflection of a different object at the same angle I have decided to only focus on one vehicle and change the title of my project to Restoration/Modification and focus entirely on one vehicle which will involve modelling the entire interior of the vehicle using my own designs which I will begin to do and hopefully finish by the end of this week. I have also decided to change my environment to be displayed outside of a garage which I also previously did research for just in case I decided to alter my idea slightly, so I will be producing further idea generation for this.
Garage Styles – Sketches
Below are a few sketches of the potential garages I could use for the environment of my scene, I have produced these using the various research collected previously and merging aspects from each reference to create my own style of asset. The second image was a simple sketch to attempt a style of garage which would be used more by the middle class population as I thought that the particular vehicle I’m producing is a rather standard daily used vehicle rather than a racing car or luxurious vehicle. however I have decided that this would not look great as a final product and would like to focus more on the first and third sketches due to them being slightly more complex allowing me to add further details from each concept to see which looks more appealing. These sketches will be rather useful as I can use aspects from each sketch to create my own unique style of garage, however I could have benefited from producing more research around this particular piece of work I aim to produce.


garage blockouts
Considering the lack of research around this particular asset, the blockouts produced below have actually proven to be rather successful and are extremely accurate to the sketches produced above. In my opinion, I personally like the style of the second image due to it being slightly more complex than the others however, I also like the third image as this is the particular type of garage as it is more suitable for the style of vehicle I’m producing. I am completely scrapping the first blockout due to the lack of detail, content which will make my entire scene look incredibly bland and won’t stand out to the viewer. I will further explore the last two blockouts as I think I could potentially merged some of the various aspects from each design to create my own however I am currently leaning towards the final design due to the subtle complexity which I could potentially add.


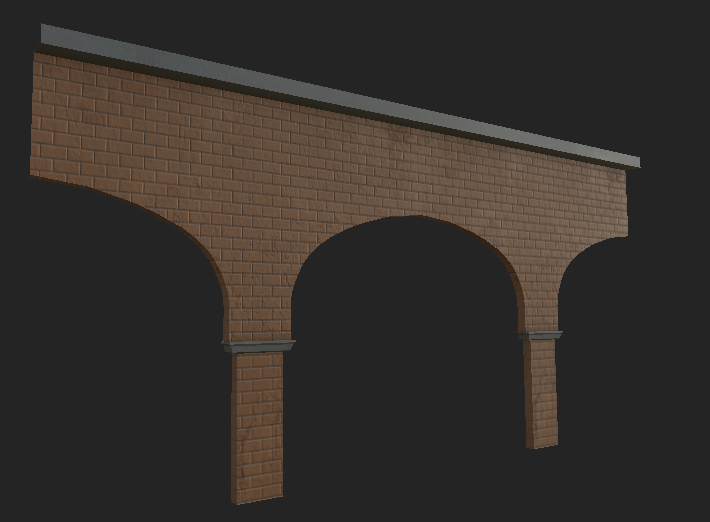
Pillar/Building Test
Once I had blocked out a set of garages using my sketches as reference, I decided to further develop one of the particular styles of garage to see how it would eventually look. Below displays a simple test piece of the pillar/archways I have developed using the basic blockouts above, which would be duplicated in a row (Shown in the second image) And then attached to a basic garage with some alterations as to make the asset slightly more complex however I’m not 100% sure whether this is the best style of garage to use just yet so I will further test my other ideas. Overall, I like the idea of this style of garage however I personally think that it would look far too basic in comparison to my main asset so I will further test with the other types to see which looks best.
I decided to test to see whether adding more detail to the roof of my current test piece to see if this would improve the overall quality of the asset, In my opinion I think this works rather well however I may have to lower the amount of garages I aim to have in my scene and create a small diorama to focus on detailing the assets to the best quality possible. Even though I didn’t necessarily produce a body of research around garages themselves, I did produce some around houses which influenced the design style of my tiles, however I could have definitely benefited from producing more research.


After testing with the rooftiles I actually really liked the outcome in combination with the pillar design which I was planning to change, however due to this having a rather visually appealing outcome I have made the decision to stick with this particular type of garage. Expanding further on the test above I have made the following garage shown below which I will definitely be adding further detail to using textures and obviously some model tests with garage doors. Overall I personally think this is turning out extremely well and I am very excited to progress through this project. However there is one flaw which could be a potential issue, which is the roof tiles, they are currently around 36,000 polys which I think is way too much so I think I will make an attempt to lower this slightly.

texture ideas
After producing the pieces of work above I decided to test some textures using substance painter to see how different textures would look for the particular asset, I’m not overly fond of the first brick texture as it lacks variation in height and colour so I think I might venture into Substance Designer to get a better quality texture for this if I decide to use a brick texture. I do however quite like the second texture as I’ve made a point to keep my normal maps less noisy by decreasing certain levels of the texture, I also personally think this is a relatively accurate replication of a concrete texture which could potentially suit my garage.

ground texture tests
Below are two images displaying a basic tarmac material created using a variety of procedurals in substance painter with a combination of height and added noise variety, this isn’t an incredible result however as a test I think it is a relatively accurate representation of the material I aim to create. The second image is just the same texture with an added mask to display a reflection, however I will no longer be using this idea for my project anymore due to many reasons explained above.


garage door model/texture tests
Below is a very simple bake of a basic garage door mainly just to test colour and texture ideas, I am not happy with the outcome of this test mainly due to such a blocky visual style and therefor will be making another attempt at this later on with some more reference material hopefully to fit the design style of my garage displayed above. I do actually like the outcome of the material due to it’s simplicity however I don’t think personally that this would fit with the texturing style I’m aiming to produce for my garage so I will further test with other colours as I progress.


Car Seats – Sketches
During this week I made a lot of changes to my idea, including adding an interior to my vehicle, so I decided to sketch a variety of seats I could model for my vehicle. These would be useful for producing my models as I have made sure to include two angles of the seat itself, however I am considering modelling the base shape of a seat and blacking it out in combination with tinted windows to give the effect that there is a full interior without having to model it completely.


steering wheel – sketches
Below are some sketches of potential steering wheel designs I could use as reference when producing the steering wheel for my vehicle, however as stated above this is not necessary anymore as I have decided to black out the interior as well as the windows which I will further explain below.


interior changes
As described above, I am going to be producing a very basic interior for my vehicle where I will eventually completely black out the interior leaving a silhouette effect which could work rather well as I’ve been looking at vehicles on sketchfab and they have produced the same effect (shown below)
I personally think this would benefit the progress of the exterior of the vehicle as to have the most amount of detail possible as this is the main focal point of my scene, If you zoom into the windows of the vehicle below you can see the silhouette effect I explained above which works incredibly well as seen in the sketchfab link below.
Car blockout tests
Below are 3 blockouts of the base vehicle shape I aim to produce with added blockouts of the components designed previously to see which would fit best. Personally I think a combination of the first and last blockout would work rather well as the front end of the last vehicle suits the shape extremely well and I think with the added larger spoiler in combination with the wide bodykit I’d like to add to my vehicle which I will be further exploring.


Car Base shape
Below are 4 images displaying the base car shape, I actually got a little carried away while modelling this and almost completely modelled the whole vehicle. This was actually extremely fun to produce and I think that I’ve done a really good job keeping the geometry clean and smooth, I will develop this further by removing the front bumper, side skirts and rear bumper and develop my blockouts further to create a very detailed version of my own vehicle I have been planning.


wide arch testing
As stated before-hand I have decided to add extended wheel arches to my asset allowing for a more modified variant of the vehicle I’ve chosen to create. Below is an image of a simple archway designed to purposely extrude further than the usual archway of a vehicle would to replicate a modern style modified version of the vehicle chosen to model. Personally I think that I could alter this to fit properly with the model itself and use smoothing groups to potentially fix the issues I will inevitably face during the production of this particular component. Overall I think this arch fits the vehicle however could be further extruded to define the fact that these components are altered.

front bumper/wheel arch merge test
Using my front bumper blockouts and sketches I have designed my own style of front bumper seen below, intended as a test however as I further detailed the component, it started to really come together and really suited the vehicle shape which can be seen in the second image. I also merged the bumper to the extended wheel arches to allow for a smoother feel to the asset, there are some parts of the component which need extra detail for the smoothing to work better however at the current rate I feel that this is going extremely well.


